WebAssembly components can help you build secure, fast plugin systems with well-defined interfaces. I’ll show you how, then we’ll build a plugin system for a game called Guy Fighter, which will let users install plugins that invent entirely new types of guy for them to pit against each other.

Table of Contents
Open Table of Contents
Introduction
When shipping software, we often want to enable user-driven customisation and extension. For example, we could support custom instruments for our audio application, or user-created content for our video game. To support non-programmer users and closed-source development, we should enable users to load these customisations at runtime rather than requiring that users compile them into the application. This is often achieved through plugins, which are code and data packages that users place in some designated plugin directory in their filesystem. The application that they’re using, known as the host, loads these plugins and interacts with them in an application-defined manner to run the code in the plugin and transfer any necessary data.
There are several common issues with native plugin systems——ones that load machine code plugins that were likely written in a compiled language like C++ or Rust. Three big problems are: security, interface definition, and binary compatibility. WebAssembly Components are sandboxed, interoperable units of code and data with clearly-defined interfaces. In this post, I’ll walk through exactly what they are and how they address those three problems with existing native plugin systems. Then, I’ll show a concrete example of adding a plugin system to a Rust program that interfaces with plugins written in C and JavaScript.
Usual Design for Native Plugins
Native plugin systems tend to be implemented with shared libraries. The plugin code and data is compiled into a shared library, the user acquires this shared library from some community space like a forum or mod repository, and they install the plugin into some known plugin directory. The host finds all the available plugins by scanning this directory, then loads the shared library through some OS-specific means, such as dlopen on UNIX systems or LoadLibrary on Windows.
Here’s a diagram showing the main system components involved in such a plugin architecture:


The host application loads each shared library using dlopen. This loads the plugin into the same address space as the host application, so it can communicate with regular function calls. As a consequence, the plugins have the same privileges as the host application.
Before we dive in to WebAssembly, let’s look at how shared libraries exhibit our three big problems.
Security
The plugin is untrusted code. We’re loading this code into the host application and running it with the same privilege levels as the host. Even if the host or some other system components scan the plugin for malicious code, we’re still opening the system up to all kinds of attacks, from the plugin installing a keylogger, to exfiltrating sensitive files, to taking over the whole computer.
Interface Definition
Native plugin systems have a few options for how they define their interface, depending on how they are intended to be used. In order to support the widest range of plugin implementations, many systems provide C headers that define the functions that the plugin should expose and the functions that are available to call on the host. For example, we might require that plugins expose a plugin_init function that the host can call, and the host may provide a host_register_data function that the plugin can call.
C is the most common option, because essentially every widely-used general-purpose programming language can call C functions. However, this restricts us to a lowest-common denominator approach to API design that cannot take advantage of the more rich feature sets of other languages. For example, if we’re writing a Rust plugin, we might hope to interact with functions that return Result types to indicate potential errors, but we’ll be forced instead to use out parameters and error codes to interact with the equivalent C definitions (unless someone implements a Rust interface on top of the C one).
Binary Compatibility
If we decide that we want to define an interface that uses more high-level abstractions, then we’re going to run into binary compatibility issues. Say, for example, we want to make a clean C++ interface and the host_register_data function should take a std::unordered_map that defines the data to register. The compiled host application and the compiled plugin need to agree on the binary layout of std::unordered_map in order for this to work. C++ does not define the binary layout of standard library types, nor does it make a guarantee that they won’t change between standard library implementations, or different versions of the same standard library, or even the same version of the same standard library with different compiler flags. As such, the plugin would likely need to use the same compiler and standard library configuration as the host so that the two can communicate a std::unordered_map between their functions. This is a tough restriction, and getting it wrong could result in absolutely zero errors at compile or link time, silently corrupting data when the plugin is loaded.
WebAssembly
WebAssembly (Wasm) is a low-level programming language designed as a compilation target for other languages. Just like C++ may compile to x64 or ARM machine code, it can compile to Wasm and run on a Wasm virtual machine.
Some of the key benefits of Wasm are:
- Sandboxed execution: Wasm code cannot interact with the system outside of the Wasm virtual machine except through carefully-controlled interfaces, making it a safe environment for untrusted code.
- Speed: While of course running in a virtual machine adds runtime overhead to Wasm applications, the Wasm binary format is designed to map onto efficient machine operations, enabling highly-performant virtual machine implementations backed by just-in-time (JIT) compilation.
- Portability: Wasm code is not tied to a specific platform, therefore a unit of Wasm code can run in any environment that provides a Wasm runtime with sufficient capabilities.
Although, as you may guess from the name, Wasm was originally designed for use on the web, Wasm is also applicable in non-web contexts that can make use of the above benefits. This is supported by non-browser Wasm execution environments such as Wasmtime, which we’ll use later in this article.
Modules
Wasm functions, types, and data are bundled into units called modules. Modules interact with the world outside of their own execution through exports and imports. Exports define functions, data, or regions of memory that exist in the module and are available to the host, whereas imports define entities that must be exposed by the host and made available to the module. If we wrote a Wasm module that implemented the plugin interface described above, then plugin_init would be a function exported by the module, and host_register_data would be a function imported by the module.
Since modules run in a sandboxed environment and provide a way to define their interfaces, this gets us part of the way to solving the three issues described earlier. Unfortunately, the functions that modules can export and import are very limited: they can essentially only use integers and floating point values as their parameter and return types. This is even worse than C, which can at least use structs and unions. If we want to really solve the problem of interface definition, we’ll need more than that.
Components
Wasm components are higher-level units of Wasm code and data. A component may contain multiple modules, and it defines its interface through a specialised description format called the Wasm Interface Type (WIT) language. Unlike modules, components can only export and import functions and interfaces, not memory regions, which strengthens the sandbox around them. However, the set of types that components can use in their interfaces is vastly expanded, allowing the definition of richer APIs that can make use of higher-level abstractions.
WIT Types
Concretely, WIT defines the following types that can be used in component exports and imports:
- Numeric types:
bool, signed integers (s8,s16,s32,s64), unsigned integers (u8,u16,u32,u64), floating point (f32,f64) - Text types:
charandstring, both Unicode1 list<T>: An ordered sequence of values of typeT(not a linked list, this is more likestd::vector<T>in C++ orVecin Rust)option<T>: Either aTor nothing (likestd::optionalin C++ orOptionin Rust)result<T,E>: Either aTor anE(likestd::expectedin C++ orResultin Rust)tuple<Ts...>: A fixed-length sequence of values of the given types (likestd::tuplein C++ or Rust’s built intuple)record: A value that contains named fields with specified types (like structs in C++ and Rust), e.g.:
record cat {
    name: string, // Name comes first, then colon, then type, fields delimited by comma
    silly-nicknames: list<string>,
    age: u32,
}variant: A value that contains exactly one of the listed cases, which may have associated data (likestd::variantin C++ orenumin Rust), e.g.:
variant cat-toy {
    ball,
    wand,
    teddy(string), // Variant cases can have associated data, like the teddy has a name
}enum: A value that contains exactly one of the listed cases, which cannot have associated data (likeenumin C++), e.g.:
enum cat-type {
    ragdoll,
    bengal,
    persian,
}flags: A set of named booleans (like anenumthat’s used as bitflags in C++), e.g.:
flags cat-flags {
    is-fluffy,
    has-eaten-today,
    wears-a-collar,
}- Type alias: like
using T = OtherType;in C++ ortype T = OtherType;in Rust, e.g.:
type cat-registry = list<cat>;func: A function with specified parameters and return type, e.g.:
eat-food: func(hungry-friend: cat, amount-of-food: u32)-> mess;
// Like the C++ function mess eat_food(cat hungry_friend, uint32_t amount_of_food);
// Or the Rust function fn eat_food(hungry_friend: cat, amount_of_food: u32) -> mess;resource: An opaque handle to an object that satisfies a specified interface2
As you can see, WIT gives us a whole lot more to play with when we’re defining our interfaces. With those available, let’s look at how we can use WIT to specify components.
WIT Interfaces, Worlds, and Packages
WIT defines three higher-level concepts that enable us to describe collections of program entities and how components can be wired up together: interfaces, worlds, and packages.
An interface is a collection of types and functions. It doesn’t describe who implements these functions, it just says that they exist and bundles them all together under a single interface name. For example, we could define interfaces for the init_plugin and host_register_data example above like this:
interface plugin-api {
    init: func();
}
interface host-api {
    record data {
        // Some definition for the data that we're going to register
    }
    host_register_data: func(to-register: data);
}
This defines an interface called plugin-api that consists of a single function, called init, which takes no arguments and returns nothing. It defines a separate interface called host-api that consists of a record type called data, and a function called host_register_data, which takes an instance of data as an argument.
Now that we have a description of the interfaces that are relevant to our system, we can define parts of our system that export and import these interfaces. For this, we’ll define a world. A world defines the imports and exports of a component in the system. We’ll have one type of component: a plugin that implements (exports) the plugin API and depends upon (imports) the host API:
world plugin {
    export plugin-api;
    import host-api;
}
We don’t define a world for our host, because our host is not going to be a Wasm component; it’s going to be the application that embeds the Wasm runtime. The runtime host will provide the implementation of host-api that the plugin world imports.
All WIT definitions belong to a package, which is like a namespace in C++ or module in Rust; it groups together all our definitions and ensures that the names don’t conflict with the same names in other packages. For example, we can define the package plugin-system in the namespace sy by putting this definition at the top of the file:
package sy:plugin-system;Interfaces, worlds, and packages give us a high-level, machine-readable definition of the boundaries of the components in our system. The binary format of data that is passed between the exports and imports of components is strictly defined, so we can write code in any programming language and, so long as we stick to this binary format, we can communicate with another component through these interfaces.
Note that, with this, we have solutions to all three of our main problems:
- Security: Components run in a sandboxed environment with controlled interfaces
- Interface Definition: WIT provides rich types that go beyond C’s limitations and map directly on to higher-level programming concepts
- Binary Compatibility: The binary format is stable so any language can communicate with any other through these interfaces
Here’s a diagram showing what the architecture of our Wasm-based plugin system looks like:


The host application embeds the Wasm runtime. Rather than loading the plugins into the host application, we load them into the Wasm runtime, which sandboxes their execution. The host application communicates with the plugins through a carefully-controlled interface supplied by the Wasm runtime.
The last piece of the puzzle is tooling. Based on the WIT description, we can use tools such as wit-bindgen to automatically generate bindings for whatever programming language we’re using that handles the binary format for us, letting us call functions that other components export without having to think about the communication layer.
Now that we have all the theory out of the way, we can look at what tools are available in practice and how we could build a system like the one described.
Building a Plugin System
For the rest of this post, we’ll focus on taking an existing toy application that I’ve built in Rust and add support for a Wasm-based plugin system. We’ll implement two plugins: one in C and one in JavaScript.
Guy Fighter
The application I’ve written is called Guy Fighter. It’s a battle simulation game that pits randomly-generated guys of different types against each other in mortal combat. Here’s how it looks in action:
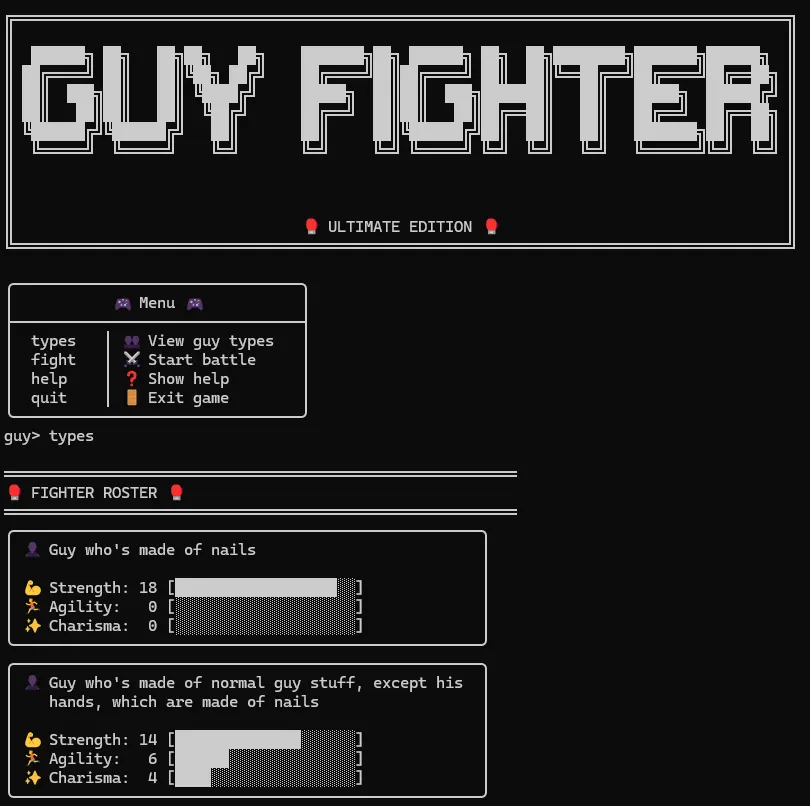
As you can see, there’s only two types of guy built in to the game. This very quickly becomes stale. To add more variety to the game, we should allow the player to install plugins that register entirely new types of guys, who can then fight each other.
The WIT Definition
We’ll start by defining the interfaces and worlds that are relevant to our system. It’ll look very similar to the definitions in the previous section:
package tl:guy-fighter;

interface host {
    record type-of-guy {
        name: string,
        strength: u8,
        charisma: u8,
        agility: u8,
        battle-cries: list<string>,
    }
    invent-entirely-new-type-of-guy: func(guy-type: type-of-guy);
}


world plugin {
    import host;
    export init: func();
    export get-plugin-name: func() -> string;
}
We define a package called guy-fighter in the namespace tl (for TartanLlama). We define a single interface called host, which consists of a type-of-guy record and a function to invent an entirely new type of guy. Types of guys are defined by a name, three attributes, and a list of battle cries. We then define one world for the plugin components called plugin. This imports the host interface and exports two functions: one to initialize the plugin, and one to get the plugin name. We could have put these two functions into an interface and exported that, but since we only use these in one place, we may as well just export them directly from the world.
This is all of the WIT that we need for our plugins. Now let’s look at the host code.
The Host
In order to run and interface with the plugins, the host needs an embedded Wasm runtime. There are several runtime implementations, such as Wasmer, WAMR, and WasmEdge. The one with the best support for Wasm components at the time of writing is Wasmtime, so we’ll be using that.
Assuming that we already have a cargo project set up, we can easily install Wasmtime by running:
$ cargo add [email protected]You may of course use a more recent version of Wasmtime if one is available, but usage code may be slightly different.
Generating bindings
With the crate installed, we can begin integrating it into our project. We’ll begin by generating Rust bindings for the WIT world that we defined above using Wasmtime’s bindgen macro:
use wasmtime::component::bindgen;
bindgen!("plugin");
There are a bunch of ways you can tune where bindgen looks for .wit files (you can check the documentation for the full list), but in this form, it will look for a world with the given name in a wit/ folder in the same folder as this project’s Cargo.toml file. This macro generates Rust functions and types corresponding to the WIT definition. You can see the code generated by them by setting the WASMTIME_DEBUG_BINDGEN environment variable to 1 when building the code; this will create a wasmtime-component-macro-<hash> directory in your build directory that contains the generated code. For example, it generates Rust code for the type-of-guy record roughly equivalent to:
mod tl {
    mod guy_fighter {
        mod host {
            #[derive(Clone)]
            struct TypeOfGuy {
                name: String,
                strength: u8,
                charisma: u8,
                agility: u8,
                battle_cries: Vec<String>,
            }
        }
    }
}
As such, we can add the following use declaration after those bindgen invocations to easily access TypeOfGuy:
use tl::guy_fighter::host::TypeOfGuy;Defining types
Let’s also define a bunch of types to hold the various types of guy and the state of our plugins:
pub type PluginId = usize;

pub struct GameState {
    pub builtin_types_of_guy: Vec<TypeOfGuy>,
    pub invented_types_of_guy: RefCell<Vec<(PluginId, TypeOfGuy)>>,
    pub plugin_descs: HashMap<PluginId, PluginDesc>,
    pub next_plugin_id: PluginId,
}

struct PluginState<'a> {
    plugin_id: PluginId,
    game_state: &'a GameState,
}

pub struct PluginDesc {
    pub name: String,
    pub path: PathBuf,
}
We’ll give integer identifiers to our plugins so we can track which is which, so we define a PluginId type alias. Our game state holds the types of guy that are built in to the game, the ones that are invented by plugins, a map from plugin IDs to plugin descriptions, and the next plugin ID that is going to be allocated (this will increase by one each time a new plugin is registered). We wrap invented_types_of_guy in a RefCell, which moves borrow checking of the Vec from compile time to run time. We do this so that plugins can hold immutable references to the global game state, but can mutate the invented types of guy when they register new types of guy. The plugin state consists of the ID for the plugin and a borrow of the game state. If you’re not familiar with the 'a syntax, that’s Rust’s way of specifying that the PluginState cannot outlive the GameState that it references. Finally, our plugin description consists of a name and the path to the plugin on disk.
Let’s initialize our game state with the built in guys and some reasonable defaults for the other members:
impl GameState {
    pub fn new() -> Self {
        GameState {
            builtin_types_of_guy: vec![
                TypeOfGuy {
                    name: "Guy who's made of nails".to_string(),
                    strength: 18,
                    agility: 0,
                    charisma: 0,
                    battle_cries: vec!["Nailed it!".to_string()],
                },
                TypeOfGuy {
                    name: "Guy who's made of normal guy stuff, except his hands, which are made of nails".to_string(),
                    strength: 14,
                    agility: 6,
                    charisma: 4,
                    battle_cries: vec!["Why is life pain?".to_string()],
                },
            ],
            invented_types_of_guy: RefCell::new(vec![]),
            plugin_descs: HashMap::new(),
            next_plugin_id: 1,
        }
    }
}
We set next_plugin_id to 1 so that the first plugin will get that identifier. The built in types of guys are the ones I had already implemented, and the other two members are empty for now.
Loading and running plugins
We’ll define a function called load_plugins, which we’ll call during the game initialisation like this:
    // Find the plugins directory in some way that's not very interesting
    let mut state = GameState::new();
    load_plugins(&mut state, plugins_dir)?;
There’s a lot to the implementation of this function, so we’ll walk through it step-by-step
pub fn load_plugins(state: &mut GameState, plugins_dir: &Path) -> wasmtime::Result<()> {
    let engine = wasmtime::Engine::default();
    let mut linker = wasmtime::component::Linker::new(&engine);
    // ...
}
Engine::default() gets us a Wasmtime engine with some reasonable settings. There’s a whole load of configuration options you can pass, which you can find in the docs for wasmtime::Config. The Linker is the part of Wasmtime that is responsible for linking components together by resolving function names to their implementations. We’ll need to tell the linker about any Wasm functions that we want to call. bindgen helps us by generating an add_to_linker function for any WIT worlds that have imports that we can implement. We can call it like this:
Plugin::add_to_linker(&mut linker, |state| state)?;We pass two arguments to add_to_linker: the linker, and a closure. When we eventually create instances of Plugin for each specific plugin file, we’re going to attach some state to the instance. The closure we pass takes this state and returns only the part of the state needed by the implementations of the component’s imports. In this case, state is going to be an instance of PluginState, and we’ll need access to the entirety of the PluginState object when we implement invent_entirely_new_type_of_guy, so the closure we pass simply returns its argument.
Now we can finish the implementation by looping through all the files in the plugin directory and trying to load them:
pub fn load_plugins(state: &mut GameState, plugins_dir: &Path) -> wasmtime::Result<()> {
    // ...
    if !plugins_dir.is_dir() {
        return Err(wasmtime::Error::msg("Plugins directory does not exist"));
    }

    for entry in fs::read_dir(plugins_dir)? {
        let path = entry?.path();
        if path.is_file() && path.extension().and_then(OsStr::to_str) == Some("wasm") {
            load_plugin(state, &engine, &linker, path)?;
        }
    }
    Ok(())
}
We return an error if the plugins directory doesn’t exist. Otherwise, we loop through the entries in the directory and call load_plugin for each .wasm file.
The load_plugin function is responsible for loading the plugin from disk, instantiating a Plugin component from it, calling the plugin’s init function and storing aside its name and path:
fn load_plugin(
    state: &mut GameState,
    engine: &Engine,
    linker: &Linker<PluginState>,
    path: PathBuf,
) -> wasmtime::Result<()> {
    let component = wasmtime::component::Component::from_file(engine, &path)?;

    let plugin_id = state.next_plugin_id;
    state.next_plugin_id += 1;

    let plugin_name = {
        let mut store = wasmtime::Store::new(
            engine,
            PluginState {
                plugin_id,
                game_state: state,
            },
        );
        let plugin = Plugin::instantiate(&mut store, &component, linker)?;
        plugin.call_init(&mut store)?;
        plugin.call_get_plugin_name(&mut store)?
    };

    state.plugin_descs.insert(
        plugin_id,
        PluginDesc {
            name: plugin_name,
            path,
        },
    );

    Ok(())
}
Component::from_file compiles the Wasm in the given file to machine code with the Cranelift compiler. We then allocate a plugin ID for the new plugin. The next few lines of code are placed in a block so that the borrow of state is dropped before we have to mutably borrow the state to mutate the plugin description map. This block first creates a Store, which provides a place to store an instantiated component along with custom state. In this case, our custom state is an instance of PluginState. This is the object that is passed to that closure we provided to add_to_linker earlier, and which will eventually be passed to our host implementation of invent_entirely_new_type_of_guy. After creating the store, we instantiate the component, which resolves the imports of the component and prepares its exports so we can call them from our host. Thanks to bindgen, this instantiation returns an object that defines functions for all of the component’s exports, prefixed with call_. We then call the plugin’s init and get_plugin_name functions. Since the call to get_plugin_name is the last expression in the block, the entire block evaluates to the plugin name, which we assign to plugin_name.
If the plugin had other functions that we needed to call throughout the life of the program, we would keep store and plugin around, but since in this example we only need them during program initialisation, we just allow their destructors to clean up after us.
Before returning from the function, we create a new entry in our plugin description map that associates the plugin’s ID with its name and path.
Implementing the host function
The last piece we need for our host is an implementation of invent_entirely_new_type_of_guy. Our bindgen invocation generates traits for imported functions and interfaces. To provide the host implementation for an import, we implement the relevant trait on the component’s state type:
impl tl::guy_fighter::host::Host for PluginState<'_> {
    fn invent_entirely_new_type_of_guy(&mut self, guy_type: TypeOfGuy) -> () {
        self.game_state
            .invented_types_of_guy
            .borrow_mut()
            .push((self.plugin_id, guy_type));
    }
}
The tl::guy_fighter::host::Host trait represents the host implementation side of the imported host interface. Whenever a plugin calls invent_entirely_new_type_of_guy, this function in our host will be called. Note that we take two arguments: a reference to the plugin state, and the type of guy to invent. The first argument is passed by the Wasm runtime, the second is provided by the plugin when it calls invent_entirely_new_type_of_guy on its side. Our implementation simply borrows the invented_types_of_guy field of our game state as mutable (recall that we defined this as a RefCell specifically for this purpose) and pushes a new registration.
Other than a bunch of UI work that’s not relevant to the subject of this post, our host implementation is done and we can turn our eyes to the plugins, starting with the C one.
C Plugin
For our C plugin, we need two key toolchain pieces:
- A compiler capable of producing Wasm modules from C
- A tool to generate a Wasm component from the Wasm module
- A tool to generate C bindings from a WIT definition
Sufficiently recent versions Clang can produce Wasm modules themselves, but you’ll have an easier time using the WASI SDK, which pre-configures the toolchain for producing Wasm and includes libc pieces that our bindings will expect to exist. It helpfully provides pre-built Debian packages that you can install.
To generate a component from the compiled module, we’ll use wasm-tools, which you can install with the following command:
$ cargo install wasm-toolsFor generating bindings, we’ll use wit-bindgen, which can generate bindings for C, along with a bunch of other languages. You can install this by running:
$ cargo install wit-bindgen-cliYou can find full documentation that I wrote for wit-bindgen’s C generator here, but I’ll cover everything we need.
Generating bindings
Assuming that our .wit file is in guy-fighter/wit and we want to generate the bindings into the c-plugin/gen directory, we can run the following command:
$ wit-bindgen c guy-fighter/wit -w plugin --out-dir c-plugin/genThe c argument tells wit-bindgen to generate C bindings. The next argument gives the path to the directory that holds our project’s WIT files, which will be searched for the world specified with the -w option. Since we only have one world, we could omit this argument, but I’ve kept it for completeness. The --out-dir argument, as you may imagine, specifies the output directory.
This will generate three files: a header with declarations for the bindings, a source file with implementations of helper functions and wrappers, and an object file that contains type information about our component and must be linked in to our binary.
The relevant functions and types that the bindings declare for us are:
plugin_string_tandplugin_list_string_t: C types corresponding tostringandlist<string>, with the following definitions:
typedef struct plugin_string_t {
  uint8_t*ptr;
  size_t len;
} plugin_string_t;

typedef struct {
  plugin_string_t *ptr;
  size_t len;
} plugin_list_string_t;tl_guy_fighter_host_type_of_guy_t: The C version oftype-of-guy, which looks like this:
typedef struct tl_guy_fighter_host_type_of_guy_t {
  plugin_string_t   name;
  uint8_t   strength;
  uint8_t   charisma;
  uint8_t   agility;
  plugin_list_string_t   battle_cries;
} tl_guy_fighter_host_type_of_guy_t;plugin_string_dupandplugin_string_free: Functions to allocate and free strings.tl_guy_fighter_host_type_of_guy_free: A function to free a type of guy.tl_guy_fighter_host_invent_entirely_new_type_of_guy: A function to call the importedinvent-entirely-new-type-of-guyfunction in the host.exports_plugin_get_plugin_nameandexports_plugin_init: Declarations for the exports of thepluginworld, which we must implement ourselves.
Implementing the plugin
Let’s implement exports_plugin_get_plugin_name first:
void exports_plugin_get_plugin_name(plugin_string_t *ret) {
    plugin_string_dup(ret, "Deluxe Dog Plugin");
}
We call plugin_string_dup, which allocates space to hold the name of our plugin and copies in the contents. The memory for this allocation will be freed by the host bindings, which will call a post-return function in the plugin that is generated by wit-bindgen.
Now let’s implement exports_plugin_init, which has more to it:
void exports_plugin_init() {
    tl_guy_fighter_host_type_of_guy_t new_guy = {
        .strength = 12,
        .charisma = 10,
        .agility = 10,
    };
    plugin_string_dup(&new_guy.name, "Guy who's secretly a dog and also made of nails");

    plugin_list_string_t battle_cries;
    battle_cries.len = 2;
    battle_cries.ptr = (plugin_string_t *) malloc(battle_cries.len * sizeof(plugin_string_t));
    plugin_string_dup(&battle_cries.ptr[0], "Woof!");
    plugin_string_dup(&battle_cries.ptr[1], "Bark bark!");
    new_guy.battle_cries = battle_cries;

    tl_guy_fighter_host_invent_entirely_new_type_of_guy(&new_guy);
    tl_guy_fighter_host_type_of_guy_free(&new_guy);
}
First, we initialize new_guy with some attributes and set new_guy.name to point to a description of our type of guy. We then create a list of battle cries by allocating space for a list of two strings, then setting those strings. We call the imported invent-entirely-new-type-of-guy function with our new type of guy. Unlike return values of exports, we are responsible for freeing any memory allocated for arguments to imports. If the imported function returned a type that requires dynamic allocation (like string or type-of-guy), we’d similarly be responsible for freeing that. See the Memory Ownership section of the documentation for more details on deallocation responsibilities for the C bindings.
This completes the implementation of the plugin. All that’s left is to build the component.
Building the component
There are two steps to building a Wasm component from our C code:
- Use the WASI SDK to build a Wasm module from the source files and type information object file
- Use
wasm-toolsto generate a component from the module
Assuming that the WASI SDK is installed at /opt/wasi-sdk and that our plugin implementation is in c-plugin/c-plugin.c, these commands will generate a component:
$ /opt/wasi-sdk/bin/clang \
    c-plugin/c-plugin.c c-plugin/gen/plugin.c c-plugin/gen/plugin_component_type.o \
    -o c-plugin/build/c-plugin-module.wasm -mexec-model=reactor
$ wasm-tools component new \
    c-plugin/build/c-plugin-module.wasm \
    -o c-plugin/build/c-plugin.wasm
The -mexec-model=reactor flag produces a Reactor module rather than a Command module, which is like producing a library rather than an executable.
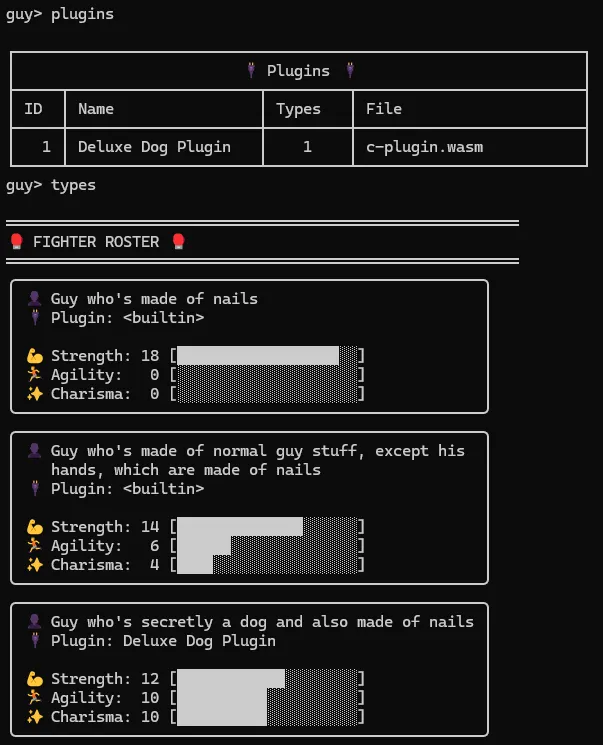
With these commands run, you can put the resulting c-plugin.wasm file into Guy Fighter’s plugin directory and it will be loaded in. With some more UI work, we can see it in action:
JavaScript Plugin
Creating a JavaScript component requires writing less code, but has a whole lot more magic behind the scenes. First, we’ll build the plugin, then we’ll talk more about the magic that enables it.
You only need to install one tool to generate a component from JavaScript: ComponentizeJS. You can install it with npm:
$ npm install -g @bytecodealliance/componentize-jsThere’s no separate step required to generate bindings; we can simply write a JavaScript file, pass it to ComponentizeJS along with the WIT world we’re implementing, and it’ll generate the bindings and compile a component in a single invocation.
The implementations of the exports are a fair bit simpler in JavaScript since we don’t need to manage the memory ourselves, and all the typing is dynamic:
import { inventEntirelyNewTypeOfGuy } from "tl:guy-fighter/host";

export function init() {
  inventEntirelyNewTypeOfGuy({
    name: "Guy who's made entirely of JavaScript",
    strength: 13,
    agility: 20,
    charisma: 11,
    battleCries: [
      "console.log('Time for DEATH!')",
      "let i_will_destroy_you = true;",
    ],
  });
}

export function getPluginName() {
  return "Coffee Guy Plugin";
}
We just define init and getPluginName functions, and the component-generation tool deals with all the plumbing for us. Any imported functions have bindings generated for them in camelCase.
To generate a plugin from this definition, we can use the following command:
$ componentize-js js-plugin/plugin.js \
    --wit guy-fighter/wit --world-name plugin \
    -d stdio -d random -d clocks -d http \
    -o js-plugin/build/js-plugin.wasm
The -d flags disable optional features that we won’t use. If you want to see the generated bindings, you can pass --debug-bindings.
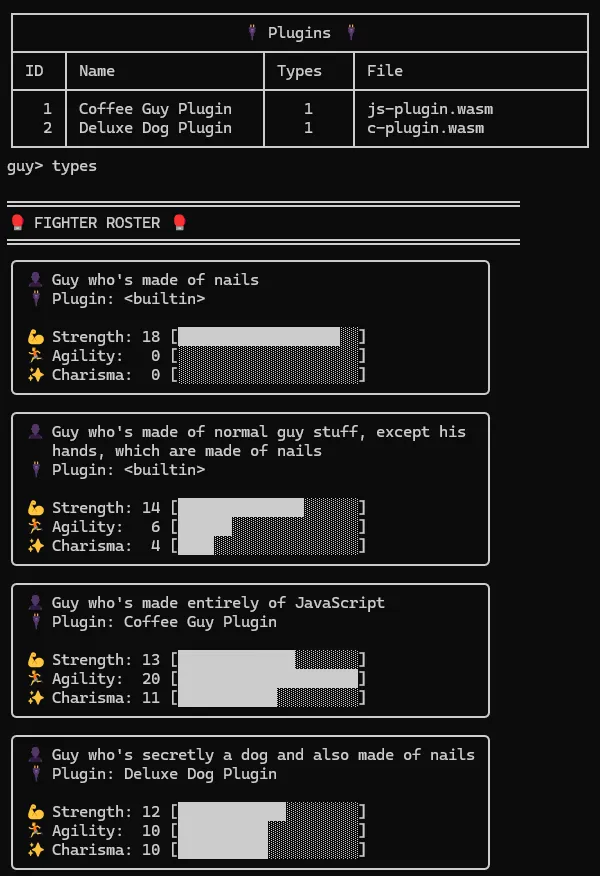
With this run, you can copy the resulting component into Guy Fighter’s plugin directory and watch it work!
The Magic
I promised we’d talk about what enables generating Wasm components from JavaScript. JavaScript is a dynamically-typed language, which complicates compiling it ahead-of-time to a language without dynamic types, such as x64 machine code, or WebAssembly. Typically, JavaScript is executed with a multi-level interpreter, where the top level is a “pure” interpreter, the bottom level is an optimising JIT compiler, and the levels in between are backed by JITs that compile faster but optimise less.
What ComponentizeJS does is say, well, if we’re not going to compile the JavaScript to WebAssembly, how about we compile the JavaScript engine to WebAssembly, dump it into the component, and use that to run the JavaScript? You can read more of the details in the Making JavaScript Run Fast on WebAssembly explainer, but that’s the gist of it: it takes the SpiderMonkey JS engine (which is used in Firefox), customises it for WebAssembly to make the StarlingMonkey engine, then embeds that in your component.
Unfortunately, there’s another problem. JIT compilation to native code is what makes JavaScript fast, but WebAssembly environments often disable runtime generation of code for security reasons. To address this, StarlingMonkey can use a mind-bending form of ahead-of-time compilation: the interpreter (which is compiled to Wasm) is partially-evaluated on the JavaScript code to produce a Wasm program that corresponds to the original JavaScript. This is a big simplification of what’s going on; you can read Chris Fallin’s blog post on weval for more details.
But why would we do this in the first place? Since WebAssembly engines are virtual machines, we can save the state of them at a given point (snapshotting) and restore it later. JavaScript engines typically take a long time to spin up while they parse the JS, generate bytecode for it, initialise the interpreter, etc. With WebAssembly, we can run the engine initialisation once for a given JS program, snapshot the state, then load the snapshotted version when we want to run the code. This dramatically improves the startup times and gives us all the sandboxing benefits of WebAssembly.
Limitations
Of course, nothing comes for free.
The WebAssembly is compiled to native code, so has runtime performance approaching that of traditional native compilation.
However, since the sandbox around components disallows the sharing of memory, applications with latency constraints that would prefer to pass shared buffers of data around for plugins to operate on would need to consider alternative options. They could for example use resources and function-based manipulations of those buffers, but that comes with additional overhead. As such, if your host has to share a lot of data with plugins without copying, the Wasm component model in its current state may not be the best fit for your application.
There is ongoing work in this area, however. The Preview 3 release of the component model comes with asynchronous streams. These can avoid copies between the host and guest components by providing the host with a buffer within the component’s memory space that it can write into directly, or pass to asynchronous I/O operations provided by the operating system, like io_uring. For avoiding copies between components themselves, there’s work on shared heaps which could be leveraged for views of a single buffer with exclusive ownership of this view being passed between components.
Conclusion
We successfully built a plugin system for a game that is secure and has well-defined interfaces at the source and binary level. You can find the full code for Guy Fighter on GitHub. Stay tuned for more posts about the Wasm component model.
Acknowledgements
Thanks to Yosh Wuyts and Luke Wagner for feedback and guidance.
Footnotes
-
Specifically,
charis a Unicode Scalar Value. ↩ -
Resources have a fair amount to them and they’re not super relevant for this use case, so have a look at the documentation if you want to learn more. ↩